Recovering a failed Unifi Controller installation
2022-12-26
By Sumit
I had my Unifi Controller on a Raspberry Pi 4B+ using a Sandisk 64Gb USB stick. A couple of months ago, after an unexpected electricity failure the Controller just went offline as in I couldn't access the website any more. Thus it went to the top of list of home IT management tasks these holidays. Step 1 was identifying what is wrong with the Pi to being with.
Identifying bootup issue
Luckily the Pi is close to our TV, so I plugged it in and powered it up.
First set of errors looked like storage errors, but the boot process kept going:

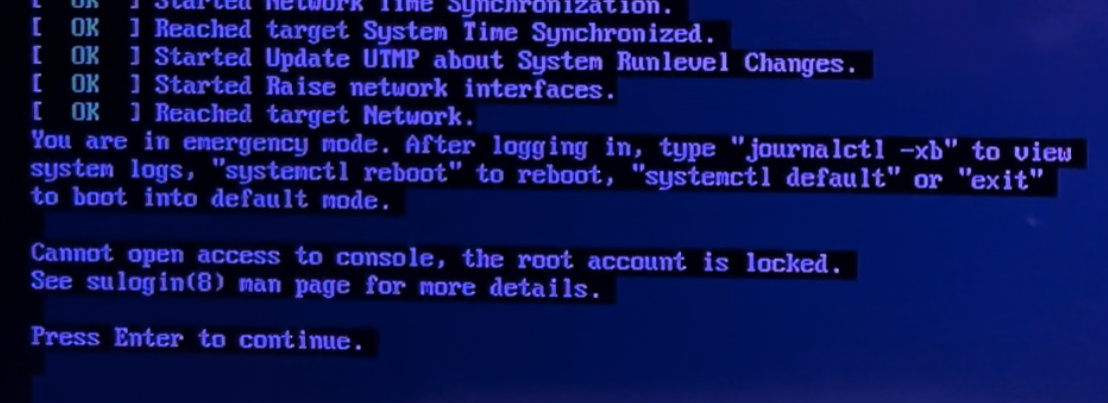
However, it ended with proper meltdown message.

I initially got side tracked with the error because on searching it said, I could change the cmdline.txt file and boot into a shell and change the fstab file. Now that is useful, if somehow the fstab file got corrupted and you had to update the fstab file manually. However, in my case this was a totally false alarm. After, mucking around in the fstab file I couldn't do much that change the bootup errors.
This much was certain, the boot files were corrupted.
Mounting partitions of a corrupted boot media
After a little exchange with my friend Sachin he showed me how I could take the USB stick and plug it into a Linux box and mount the partitions on it. So I fired up a spare Raspberry Pi and got cracking.
First you need to identify if you can still read the paritions.
ls /dev/sd*
The above should return a list of folders among which /dev/sda* would normally be your primary partitions and /dev/sdb* would be the partitions of the sdcard/USB drive you plugged in additionally.
Next we create a temp directory and try to load the partitions. A vanilla Rasbpian OS or Raspberry Pi OS will have two partitions. One FAT partition that has the config files you can modifiy on any OS, and one EXT partition that's loaded once the OS loads. So all your data will be in the EXT partition usually.
# Create temp directory
mkdir /tmp/part1
mkdir /tmp/part2

# Mount FAT partition into temp directory
sudo mount /dev/sdb1 /tmp/part1
# Mount EXT partition into temp directory
sudo mount /dev/sdb2 /tmp/part2
If you have managed to load these two partitions then you are nearly home. You will mostly likely be able to restore your controller, there is BUT though. You would hope you have taken atleast one Controller Backup at some point in the past.
These backups are most likely stored in the following folder
/usr/lib/unifi/data/backup/autobackup
OR
/usr/lib/unifi/data/backup
The files have .unf extention.
If you find one of these you are almost home and dry. Copy the file that's the newest to your local machine from where you can access your new Unifi controller setup.
Setup new Unifi Controller
On a fresh new Raspbian OS installation (I use the 64bit Lite edition), ssh into it first and run sudo apt-get update and sudo apt-get upgrade. If you are lucky and you've used Raspberry Pi Imager you won't have much to update.
Next, update the dhcpd.conf file to set a static address
sudo nano /etc/dhcpcd.conf
In the file find the following lines, uncomment them and set the IP address you want for the Controller and the IP address of your DHCP controller.
static ip_address=192.168.1.50/24
static routers=192.168.1.1
Save the file and exit Reboot the Pi
sudo reboot now
Install rng-tools
sudo apt install rng-tools
Cleanup Package repository
sudo apt autoremove
Update the rng-tools-debian file
sudo nano /etc/default/rng-tools
Uncomment the following line. This enables a slightly faster bootup sequence.
HRNGDEVICE=/dev/hwrng
Restart the rng-tools service
sudo systemctl restart rng-tools
Add Unifi package repository (long command, scroll to the end)
echo 'deb [signed-by=/usr/share/keyrings/ubiquiti-archive-keyring.gpg] https://www.ui.com/downloads/unifi/debian stable ubiquiti' | sudo tee /etc/apt/sources.list.d/100-ubnt-unifi.list
Get the GPG Key
curl https://dl.ui.com/unifi/unifi-repo.gpg | sudo tee /usr/share/keyrings/ubiquiti-archive-keyring.gpg >/dev/null
Update package repository
sudo apt update
Install JDK and unifi
sudo apt install openjdk-8-jre-headless unifi
Reboot
sudo reboot now
You should now be able to get to the Controller Home page at https://192.168.1.50:8443/, that asks you to setup a new account or restore from backup (Change the IP address to what you had provided in the ).
Next step I am a little hazy about because I starting writing this post on December 26, 2022 and it is February 26, 2023 today. I don't remember if Unifi allows you to select a .unf file from your local machine or expects the .unf file to be in a location on the Pi itself. I see the following commands in my terminal history, so in case you can't upload via the browser, copy the .unf backup from your local machine to the Controller Pi using scp or a tool like Filezilla and select that file.
Reboot and set
sudo reboot now